Wednesday, September 15, 2021

San Juan Preservation Trust

The San Juan Preservation Trust has permanently protected more than 19,000 acres of land throughout the San Juan Islands. They are not always easily accessible by boat but many are worth the effort when you need to stretch your legs.

As sailors, we are blessed with an abundance of choices and destinations. But for the last 20+ years we straight-lined into Canada with Barkley Sound, Desolation Sound or the Gulf Islands as our main attractions. There was a sense of been there, done that, locally. Having spent a lot of time scuba diving the San Juans in my teens and twenties, and yearly visits in the family boats in my childhood, a certain level of familiarity had set in.

But the pandemic and the resulting closure of the Canadian border this year and last, had us searching for new anchorages and new adventures in our local waters. There are so many classic anchorages in the San Juan Islands that it is easy to visit the same places over and over. Some of our favorite places conjure such strong memories for us that they never get old. But we like to search out new experiances on every visit, and with the abundance of land that has been preserved for generations, it's not hard to find new favorites.

Many times it will be a suggestion from a fellow boater that awakens us to a new-to-us anchorage. Other times it's simply a new chart with a anchor icon that spurs our interest. Lately, we pour over the San Juan Preservation Trust website to find new hiking trails, and surrounding bays and forects. Most of this land is acquired by local landowners and is not open to the public. However, there are quite a few gems that are open to the public.

Here are two of our favorites:

Watmouth Bay Preserve, Lopez Island. We tend to tuck into Watmough as our first stop after the 7-8 hrour cruise up from our slip in Kingston. Nothing beats the quiet and the majesty of anchoring next to the cliffs and watching the osprey and kingfishers feed their young. Our 'quick' stopover sometimes last 2-3 days. Anchoring is good, but often times comes up with a load of kelp. The 470ft vertical hike up to the top of Chadwick Hill helps to shake off the hours spent at the wheel and can be spectacular on a clear day. There are many options when it comes time to stretch your legs. See the map for more detail.

Graham Preserve, Shaw Island. We have hiked this trail from both Indian Cove on the south and from Blind Bay on the north. It's an easy 1.2 Mile hike and can be accessed by kayak, paddleboard or dinghy from either side. From Blind Bay, use the dinghy dock at the ferry landing. This will add a few more miles to your hike, but you can power up with an ice cream cone or coffee as a bonus. The trail starts next to the community center, which is one of the only places that take recycling in the islands! There is a book exchange at the community center area as well. Check the map for more detail.

Kimball Preserve, Decatur Island. This is a nice spot to anchor on the north of the preserve between Center Island with good crabbing. There are no public docks or landing facilities on the island so a quick row to the tombolo on the north shore or land on the south side of the isthmus that connects the tombolo to the headlands. The beach is low bank and easily accessible from Lopez Pass. The trail around the tombolo, on the west side of the Preserve, leads from the beach and circles the island on the west end. There is also a trail that accesses the headlands on the east side of the Preserve. The eastern Preserve boundary abuts privately-owned land which is protected by a conservation easement with SJPT. The public trail ends here. See the map for more detail.

Sunday, May 30, 2021

Interfacing a Garmin ECHOmap with Raymarine Autopilot, DSC, AIS, etc.

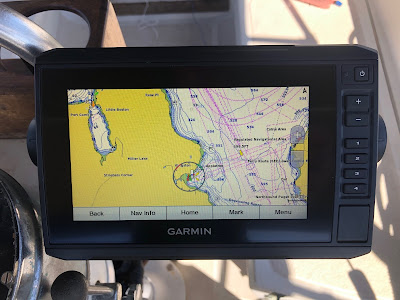
Saying goodbye to my trusty 17 year old Garmin 178C chartplotter/sounder was hard. It's never failed, short of the weird, intermittent and very infrequent GPS scrambles (I blame on the Navy). But when the GPS can no longer connect to the satellite constellations, you know it's time to move on.

The root issue is Garmin is no longer updating the software on my old device and don't offer any viable Apple solutions for getting a the third-party supported upgrade. Planned obsolescence? Moving on!

I started my search by researching Raspberry Pi, upgrading my iNavX and Navionics on my iPad/iPhone. I then decided I wanted a waterproof, sunlight readable device at the helm. Since Garmin bought Navionics and Active Captain in 2017, I figured the advantages of sharing maps and data under one manufacturer might be best in the long run.


The new Garmin ECHOmap UHD 74CV will (supposedly) connect to my Raymarine Evolution EV-100 Wheel Autopilot and steer to multiple waypoints. It has capabilities to allow me to connect to AIS, DSC, sonar, Panoptix, temperature/speed, engine guages, tank levels, and leverage it's wifi capabilities to make updates via Active Captain.

AUTOPILOT (work in progress)
NMEA 2000 network is in place and all components now 'see' each other. The Garmin ertified installer says all I need to do is set a waypoint on the chartplotter then engage the autopilot, once, then hit another confirmation button. This last step has me stumped!

The Garmin manual says "From the Autopilot screen, select MENU > Engage Heading Hold or MENU > Engage Circle. Your intended heading shows in the center of the Autopilot screen." This assumes a Garmin autopilot so not much help there.

I'll likely need to call Garmin (again) on a weekday from 7-7 CST at 1 (800) 800-1020.

This should be easy but lots of folks have struggled with Garmin to Raymarine Autopilot issues. Might have to try disconnecting components of the network or "ignore the data selection section andchoose TRACK the autopilot and GPS communicate". Might need to update the P70 software, currently at v2.17, to get the TRACK function.

Both Garmin and Raymarine run NMEA 2000 networks but with their own proprietary connections. Raymarine uses Seatalk NG. I'm told my Autopilot is new enough that I won't have these issues. It seems like the fluxgate compass may fight with the GPS for steering control. Time will tell!

Raymarine Seatalk color-coded cables: Backbone cables, plugs, sockets and terminators are coded blue. Spur cables, plugs, and sockets are coded white. SeaTalk to SeaTalk NG converter cables, plugs and sockets are coded yellow. SeaTalk NG power cables are coded red.

TRANSDUCER
The ECHOmap came with a transome mounted w/GT24UHD-TM Transducer which is cool for a powerboat, but not great with the healing on a sailboat. I mounted it temporarily on a post of the stern, just to see what CHIRP is all about.

I connected my old P79 in‑hull transducer but unfortunately, age has also degraded the P79, and it does not perform to spec. It functions well in shallower depths below 150ft (when you need it) but not so well in deep water. I have purchased a Garmin GT15M-IH Transducer which resolved the deep water issue and upgraded me to CHIRP technology.

(Airmar phone tech support had suggested I upgrade to a P75, so I could re-use my in-hull housing and step up to CHIRP technology.) I could not confirm that it would work with Garmin, and it cost a bit more than the GT15M, so I didn't take the chance.

To connect to my old P79, I purchased a C1225 cable which has the sounder port connection and a small box to connect the wires from the sounder. I hope to keep this connected and plug the Garmin GT15M-IH into my NMEA 2000 backbone.

DIGITAL SELECTIVE CALLING (DSC) (work in progress)
Standard Horizon Intrepid VHF Radio will need to receive GPS data on the Blue wire. This is an input to the radio. Connect the TX(+), Data Out wire of the Garmin. Usually Blue on Garmin.

The Green and Brown wires should be attached to TX (-), RX (-) and or ground. Connect this to the black ground wire or (-) wires on the Garmin. Usually Black on Garmin.

The output of DSC data will occur on the Gray wire at 4800 speed. Output leaving the radio. Connect this to the RX(+), Data In Garmin wire. Usually Brown on Garmin.


Instructions:

Cables Used:

Charts:

Friday, May 7, 2021

iPad and Bad Elf GPS or DIY a Raspberry PI system for Backup Navigation?

When your primary GPS chart plotter goes south, what are ya gonna do?

On a recent trip I lost GPS satelite connectivity (or it was scrambled?) with my trusty old Garmin chartplotter, yet the depth sounder continued to work fine. Yes, it's over 10 years old and needs to be replaced. It got me thinking that I don't have a true backup system, other than what I have on my iPhone running iNavX or paper charts. I also have Strava, or Avenza, or GAIA for GPS location data. Okay, so I do have a lot of options.

Luckily, my GPS seems to be working fine again, so maybe I can milk another year or two out of it? Time will tell.

In the meantime I learned that I can leverage the larger screen on my wifi-only iPad Air 2 with a Bluetooth capable, third-party GPS receiver. My iPad has no native GPS capability, but there are a number of add-on GPS options. I' picked up a Bad Elf GPS Pro Bluetooth as it integrates well on the iPad, and it's been doing so for close to 10 years! Bad Elf was the company behind the original GPS integration on early (2010) Apple iOS products. This combo will give me a large screen, mobility, low power consumption, redundancy and simplicity.

The Bad Elf GPS Pro unit charges via USB, and has a self-contained power supply. Like the iPad and iPhone, it does not consume a lot of on-board power. The GPS Pro provides a battery life of up to 16 hours when connected to your iOS device via Bluetooth, and supports a GPS reporting rate of 10 times per second . With the GPS Pro in standalone datalogger mode and Bluetooth turned off, you can expect a battery life of up to 32 hours.

GPS accuracy is 9ft (2.5m) which should be fine for my requirements. It requires no cell service, no internet connection and no monthly subscription.

I'm sure there will be a learning curve but the apps that support iPad and Bad Elf integration are vast. I think it will be an excellent solution as a backup system. Maybe I'll build out the Rasberry Pi solution next winter.

Related links:

Apps that integrate with the Bad Elf GPS Pro:

The alternative is Raspberry Pi and OpenCPN and it's myriad ways to integrate chartplotting, weather, AIS, VHF, and much more. Next year!

Saturday, April 17, 2021

Fixing a leaking water tank

After painting my bilge, replacing the keel nuts, valves and hoses, shaft seal, etc. I discovered there is still a port water tank leak. When filled to capacity, the water was bubbling out of to top plywood lid. Once the water in the fill hose empties into the tank, the leaking stoped. Probably been leaking for years...

The port tank is molded-in-place fiberglass with a plywood top screwed and glued down, with 5200 or similar. The screws do not want to back out so the top likely will need to be cut out and then replaced with a new top, possibly plexiglass for easier inspection.

The starboard side tank is newer, rotomolded plastic tank, likely replaced 30 years ago.

I'm just not up for another huge project at the moment, I went ahead and cleaned the gap and layed a few strips of fiberglass in epoxy resin over the area (see second image above). No, definitely not a permanent solution, but it's holding the water in the tank for now and not causing any damage. I'll look for a new rotomolded tank and replace it in the near future.

After watching several YouTube videos, I have a few random thoughts and a possible replacement plan.

  • Drill and install an inspection port
  • Clean the tank
  • Fiberglass and epoxy patch leaks from the inside
  • If horrible, find a replacemnt tank
  • Use the jig saw to cut around the lid
  • Remove screws
  • Chisle out remaining lid
  • Remove glue residue
  • Build new lid

Tools

  • Utility knife
  • Jig saw
  • Putty knives
  • Hole saw
  • Rubber band (thick)
  • Cutting disk/grinder/Dremel
  • Screw extractor
  • Clay (to help isolate the source of leaks)

Cleaning a water tank.

YouTube and other helpful links:


Monday, March 8, 2021

2021 Haulout, Keel Bolts, Shaft Seal, Rudder Rebuild

This place is literally a mariners heaven. Port Townsend is always a great stop-in whether provisioning, have a nice dinner or enjoy the farmers market. But it is also the best place to find a seasoned craftsmen for literally anything you need to have done on your boat.

Half the Pacific fishing fleet seems to haulout this time of year. Looking at the haulout and storage costs I found the Winter rates were half price from Oct 1, 2021 ‐ Mar 31, 2022. When there's a pile of work to do it seemed like a good time to go on-the-hard for the full month or March.

I was lucky to squeeze in in front of Barry Stephens Marine machine shop. Barry has 30 years in the business and has a fully equiped machine shop to handle the toughest jobs. He's in high demand but if you're lucky enough to get on his schedule, you know you're in good hands!

The run up to PT from Kingston is usually 4 hours with the ebb tide. We passed a large pod of killer whales off Fort Flagler which felt like a good omen and a welcome into Port Townsend Bay. The next day was planned for an early morning haulout.

The primary tasks:

  • Keel: Replace the 49 year old 1" keel nuts and lock washers and inspect the mild steel studs. I also wanted to remove the rust on the keel plate with a pneumatic needle gun, then treat with Corroseal.
  • Bilge: Paint with Rustoleum Pro Enamel adding a hardener for the cold weather.
  • Replumb and Rewire: Re-seat the bilge pump and float switch and reattach the copper ground strap.
  • Rudder: Re-glass the rudder and rebuild the gudgeon.
  • Shaft Seal: Replace the old stuffing box with a PSS Shaft Seal. Replace zincs. Straighten shaft.
  • Propeller: Replace the 20 year old propeller.
  • Bottom: Scrape, sand, bottom paint, paint bootstripe. Wrap keel join with 3 layers (8", 4" and 2" fiberglass mat) and wet-out with System Three epoxy. Fair hull with epoxy mixed with microballoons.
  • Steering: Steering cables inspected and clamps replaced. Install new throttle govener.

Rudder: Re-fiberglass soft spots. Check bearings (they were fine). Inspect/renew steering cables.

Gudgeon: Rebuild.

Bottom: Sand, glass and epoxy over keel join, fair with epoxy and microballoons, and apply ablative paint. Touch up bootstripe.

Propeller: My 20 year old propeller had developed crevice corrosion on 2 of the 3 blades. It was unrepairable, so I replaced it with a new prop from Kruger and Sons. They use Chicago Propeller and fine tune them in their shop. Supposedly their proprietary anti-fouling lasts 3 years... we'll see!

Shaft: Install a PYI shaft seal replacing the old stuffing box. Straighten shaft, add zincs.

Launch Check for leaks. All good! Check for shaft alignment. Perfect!


Sunday, March 7, 2021

2021 Maintenance

Pardon me once again for the administivia. I like to keep this information at my fingertips as I am constantly referring to it and would hate to ruin a good trip with having to work on the boat in some far off port.

Yanmar 3GM30F - 1900 hours - 01/01/2021

March:

  • Haulout
  • New propeller: 15" RH 13 MPBR
  • PYI PSS Shaft Seal 1" FWD 1-1/2" Stern Tube
  • Cutless Bearling
  • Installed 2 Zincs
  • Needle gunned keel plate
  • Re-torqued new nuts and washers on keel studs
  • Bilge Corroseal, Rustoleum Professional enamel paint with hardner
  • New brackets for bilge pump, float switch
  • Reattached ground strap in bilge
  • Epoxied keel join w/3 layers glass, 2", 4" and 8", faired.
  • Bottom paint, prepped by sanding down to fiberglass
  • Rudder gudgeon renewed
  • Rudder fiberglass and epoxy faired
  • Steering cables inspected and clamps replaced
  • Installed new throttle govener

May:

June:

  • New Jabsco marine head pump assembly

July:

  • Installed new Garmin GT15M-IH Transducer

To do list:

  • Gelcoat deck
  • Seal forward toe rail drain holes.
  • Add 1/4" aluminum backing plates to toe rails.
  • Refrigeration
  • Diesel Heater
  • Shrouds
  • Mast wiring conduit
  • Optimize solar panels

2020 maintenance »

2019 maintenance »

2018 and earlier maintenance records »